SceneArkive is your career audio editorial and sound design database. Capture your designs. Store them in one place. Recall them to Pro Tools anywhere, anytime.
One system for your post audio workflow.
SceneArkive is the living archive for episodic audio post. It captures scenes from your Pro Tools sessions, remembers every layer across every episode, and hands it all back to you the moment you need it, right into your Pro Tools session, at your desired timecode.
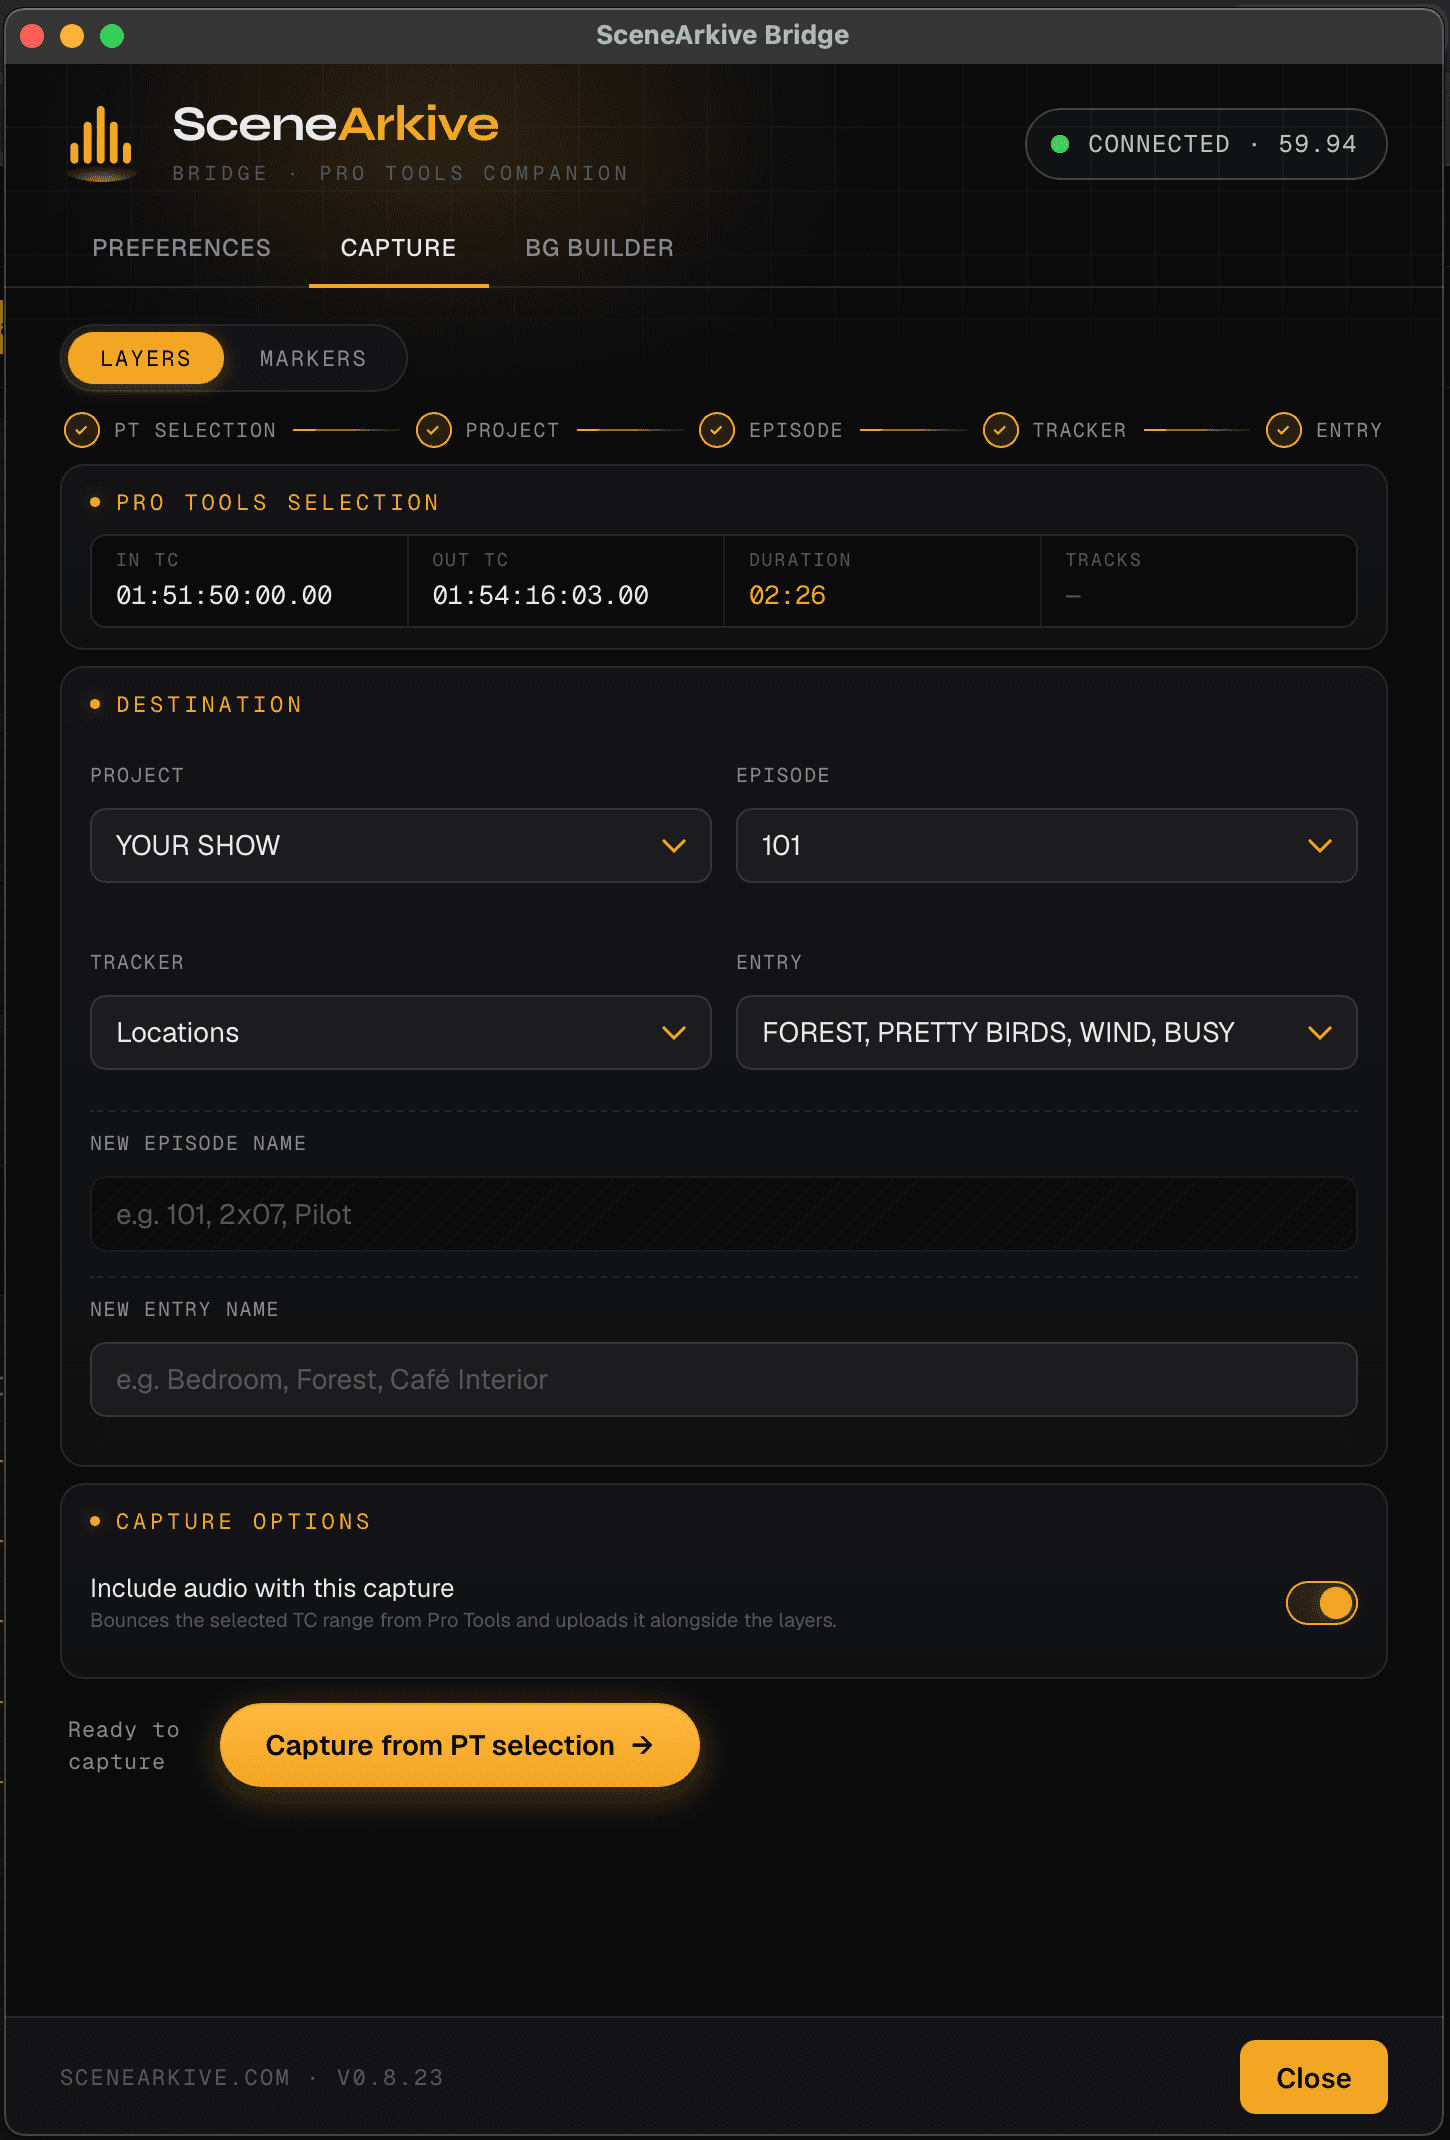
Capture straight from Pro Tools.
The SceneArkive Bridge reads your session and pulls audio with sample-accurate metadata into your archive with just one click, no exporting, no manual logging.
- Sample-accurate timecode, track, and clip data
- Real audio captured, not just notes
- One marquee selection, one click
Recall back into your session.
Send any archived entry back into Pro Tools and watch it build on the timeline at the exact timecode you choose. Pick the whole entry or just the clips you need.
- Places audio at any timecode location
- Selective clip recall
- Sample-accurate recall
Build entire BG edits in seconds.
SceneArkive BG Loader saves hours of time. Simply create Pro Tools markers at picture cuts, point them to your SceneArkive library, and BG Loader instantly populates your entire session with your BGs, recalled exactly as you designed them, sample-accurate, from scene cut to scene cut, with crossfades applied.
- Global-hotkey search overlay
- Audition before you place
- Backgrounds built straight into the timeline
Turn notes into Pro Tools markers.
Upload notes as PDF, TXT, or CSV. SceneArkive transcribes the timecodes and sends them to your session as memory-locations, every note where it belongs.
- Reads timecodes from PDF, TXT, or CSV docs
- Creates accurate memory-location markers
- No retyping spotting lists or app switching ever again
Seven trackers. Every episode. One place.
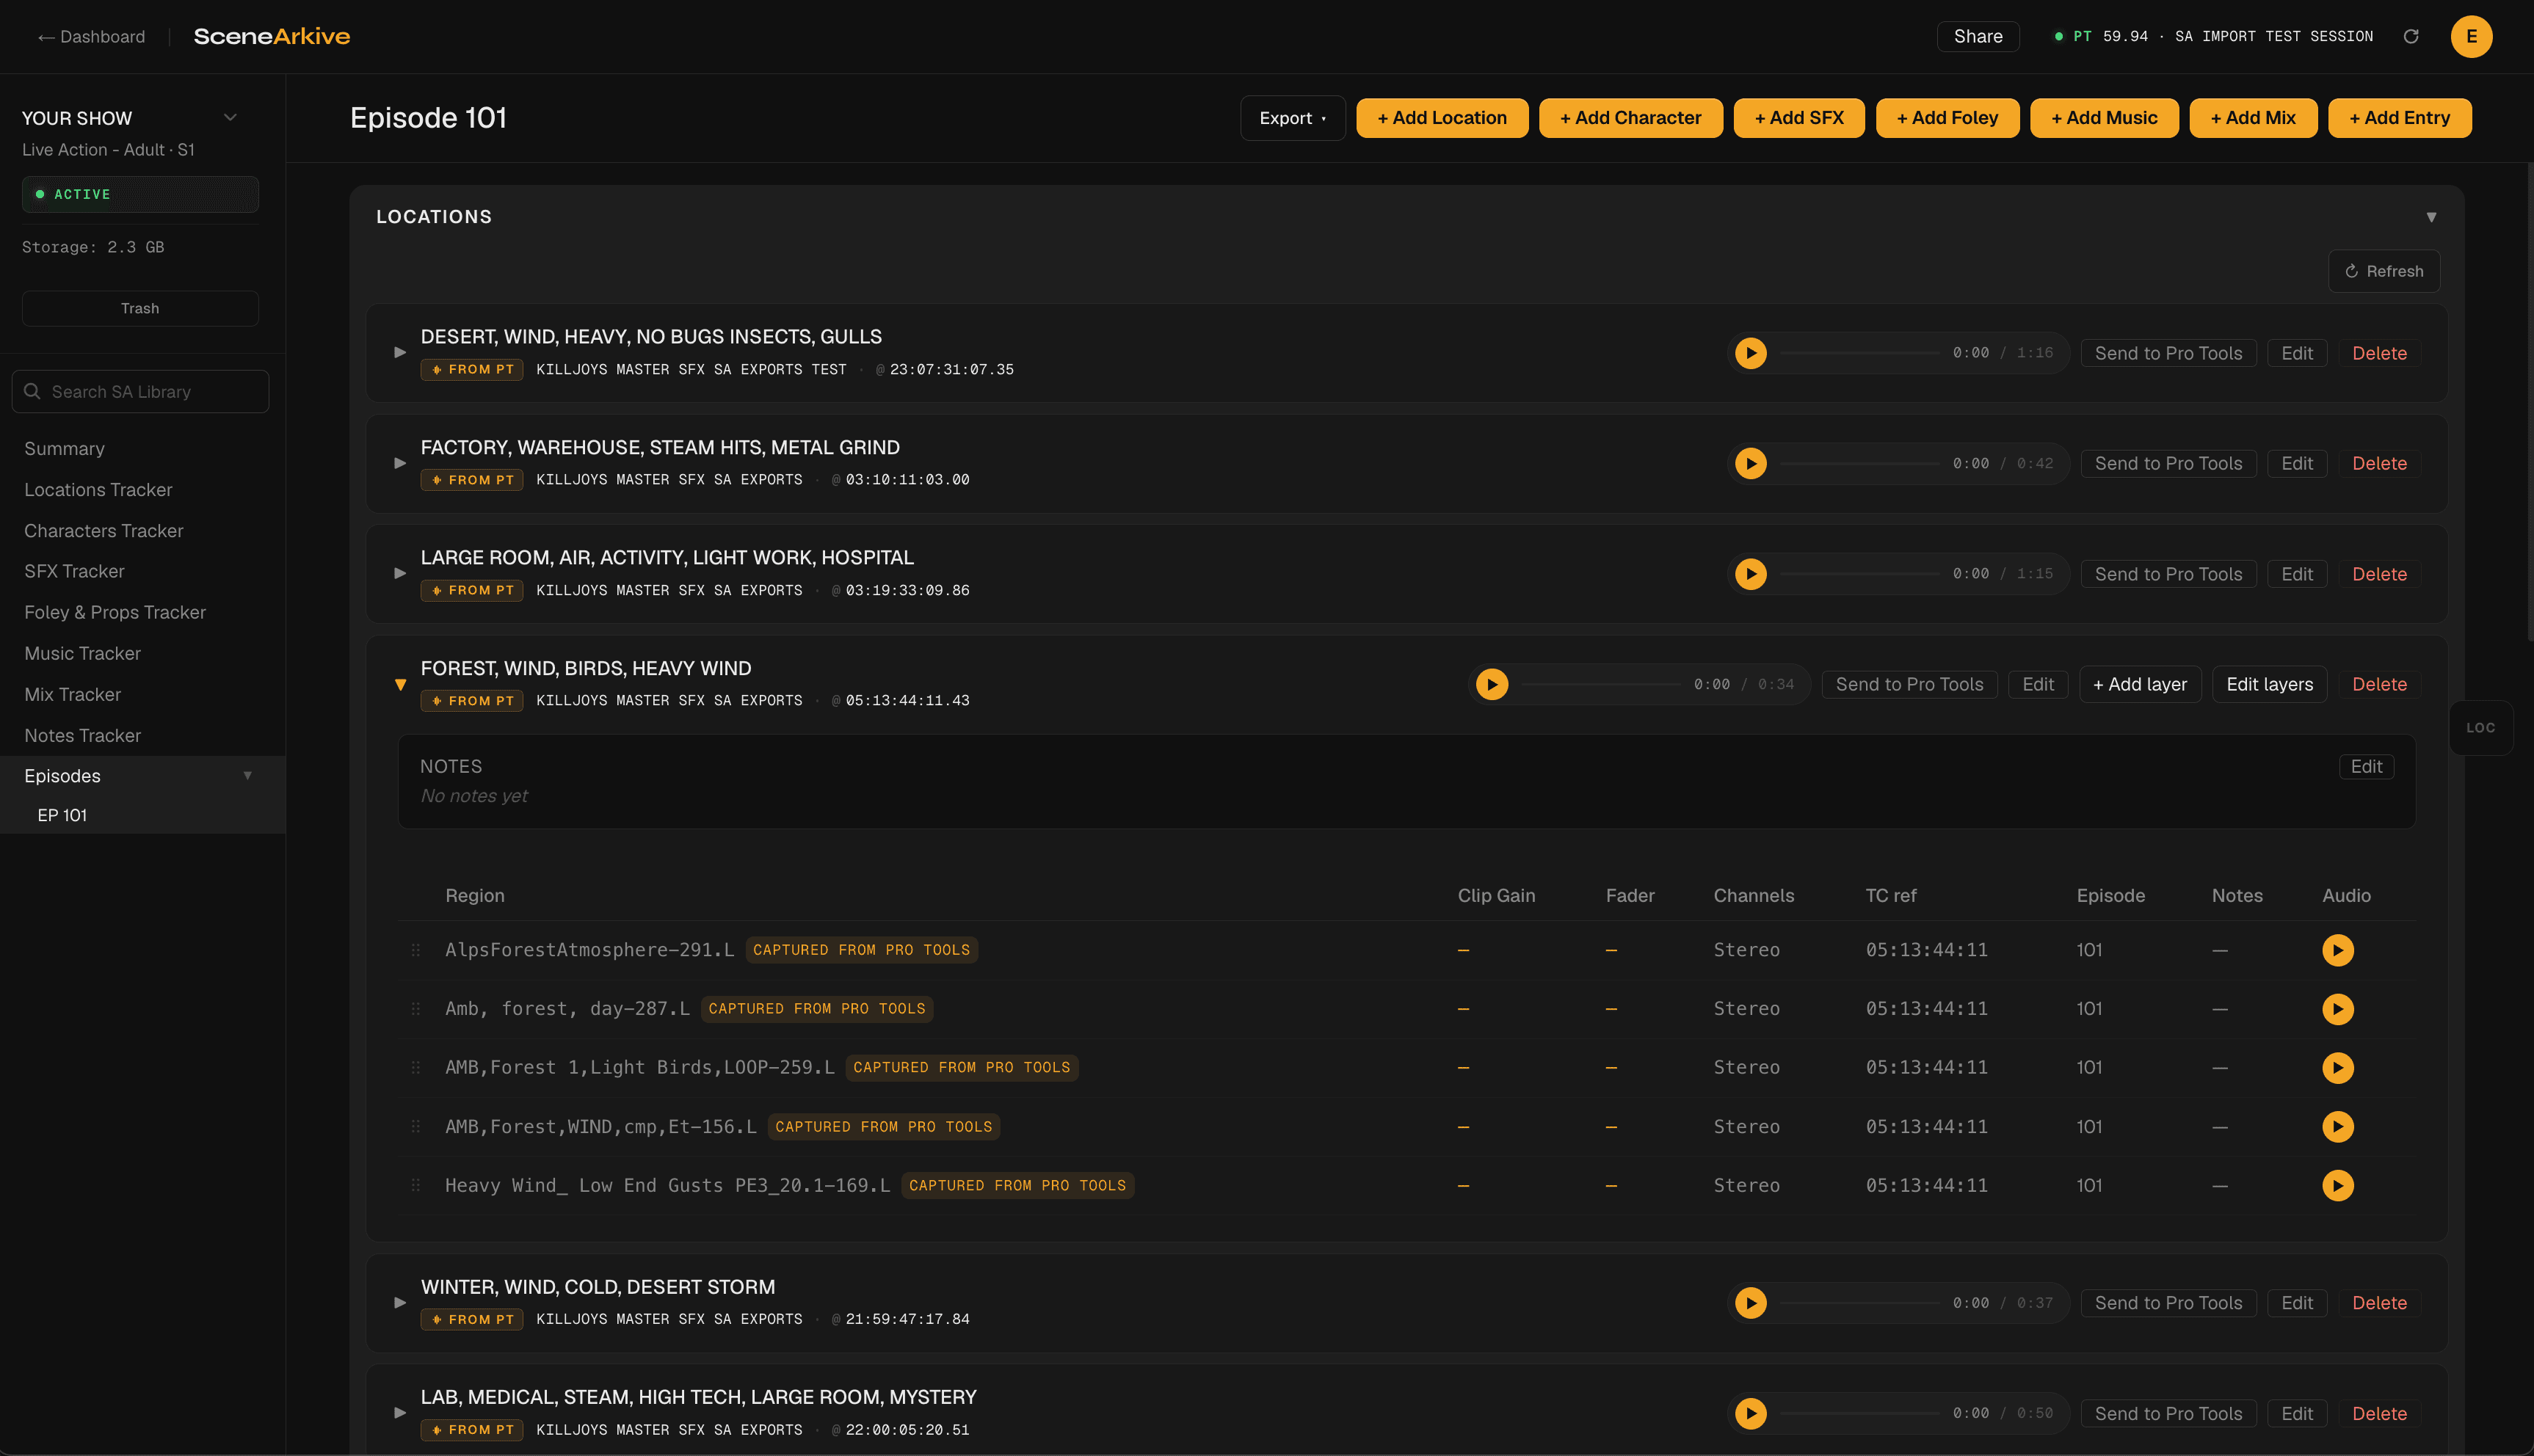
SceneArkive entries are organized by Locations, Characters, SFX, Foley, Music, Mix, and Notes. Choose to view individual trackers, or all trackers together in Episode View.
The Mix tracker reads plugin chains directly from a Pro Tools session screenshot. Drop in an image and the plugin rows populate for you.
Three steps. One bible for every show.
Capture
Make a selection in Pro Tools and the SceneArkive Bridge will capture the audio and metadata, and instantly create a new entry in your SceneArkive web library.
Archive
Your entries are stored in your SceneArkive web account, organized across seven trackers, episode by episode, all searchable and shareable to other SceneArkive users.
Recall & build
Send your audio back into any Pro Tools session, or build entire background edits instantly.
Simple, flat pricing.
- All seven trackers + Episode view
- Unlimited episodes and projects
- SceneArkive Bridge
- BG Loader instant backgrounds editor
- Notes → Pro Tools markers
- 500 GB of secure audio storage included*
- Between projects? Pause for $5.99/mo†
$29 per month. Start with a 30-day free trial. No credit card required. Cancel anytime.
* Audio is stored as compressed FLAC and deduplicated across all your captures. Deduplication ensures that shared libraries and reused audio is stored only once, and not per capture.
† Pause your subscription when between gigs, and pay only $5.99 for cloud storage. Resume or cancel anytime.
SceneArkive is built for Pro Tools, and the SceneArkive Bridge is currently Mac only. You can browse and organize your archive in any modern browser; capture and recall happen through the Bridge on a Mac running Pro Tools.
A small Mac companion app that connects SceneArkive to Pro Tools. It captures audio and metadata from your session and recalls it back to any open session. It is free with your subscription, and you can download it from your account once you sign in.
The Bridge is what makes SceneArkive powerful. It captures audio and sample-accurate data directly from Pro Tools and recalls clips back to your timeline. It allows BG Loader to create complete background edits with just one click of a button.
The Bridge captures the region audio with handles, sample-accurate clip positions and timecode, track names, and your fades and crossfades, everything needed to recall a clip exactly where it lived. Every clip's source audio is captured with long handles on both ends allowing for editorial freedom when recalled. It captures only the selection you make in Pro Tools, so you stay in control of what goes into your archive. If your session lives on a network or SAN drive, per-clip capture can be turned off in Bridge Preferences in favor of a single whole-selection bounce.
1. Make your selection in Pro Tools. Select the tracks and clips you want to capture. Capture only takes what you select, so you stay in control of exactly what goes into your archive. Tip: make sure to select all clips from start to end. 2. Open the Bridge and sign in. Launch the SceneArkive Bridge on your Mac with Pro Tools running. The connection chip turns green when the Bridge is connected to Pro Tools. If you have not created a project yet, create a project in your dashboard at scenearkive.com. 3. Set your source output. In the Bridge Preferences panel, find Audio Capture and select your Pro Tools session's source output. This is your source output for the Bounce to Disk operation so you can preview your work later. 4. Choose your project and tracker. In the Bridge select the Capture panel. Select the SceneArkive project you're capturing into, and which tracker the capture belongs to: Locations, Characters, SFX, Foley, or Music. Add an Episode Number or Name, and label your New Entry name. 5. Hit Capture. The Bridge automatically reads your selection; region audio with handles, sample-accurate clip positions and timecode, track names, fades and crossfades, bounces it, and uploads it to your archive. A progress rail shows Capture → Process → Upload → Finish. 6. Done. Your entry now lives in SceneArkive with full-resolution audio, ready to preview in the browser and recall back into any Pro Tools session, sample-accurately, anytime. View and Recall your entries from your account at scenearkive.com
No. SceneArkive never removes or alters anything in your Pro Tools session, your Audio Files folder, or your own drives. Capture only reads from your session, and recall only adds new clips on new tracks. Your original work is always left untouched.
When you recall an entry, the Bridge imports the captured audio and spots it to the timecode position of your choice on its own clearly labeled track, with your original fades recreated. Your edit is recalled sample-accurately and true to the original capture, with generous handles on both ends of all clips.
1. Open the Bridge and sign in. Launch the SceneArkive Bridge on your Mac with Pro Tools running. The connection chip turns green when the Bridge is connected to Pro Tools. Open the session you want to recall into. 2. Find your entry. Go to your account at scenearkive.com, open the project, and locate the entry you want to recall. You can preview the audio right in the browser to confirm it's the one you want. 3. Set your target timecode. Place your cursor in Pro Tools at the position where you want the audio to land. The Bridge tracks your Pro Tools playhead automatically, or you can type a timecode in manually. 4. Choose what to recall. Hit Send to Pro Tools on the entry. A window will appear allowing the option to Recall the whole entry, or select just the clips you need. Refresh the Target Timecode, or type it in manually. 5. Recall. Confirm your selections and Hit Send to Pro Tools. The Bridge automatically imports the captured audio and spots it to your chosen timecode, on its own clearly labeled tracks, with your original fades recreated. A progress rail shows the download, transcode, and placement stages. 6. Done. Your edit is back on the timeline, sample-accurate and true to the original capture, with generous handles on both ends of every clip so you have full editorial freedom.
BG Loader turns your SceneArkive Locations entries into finished background edits with just a click of a button. Locate scene cuts in your video, place Pro Tools Markers at the cut, point them to your SA Locations entries, hit Build in the Bridge App, and watch as BG Loader automatically lays out your complete BGs from scene to scene. Clips are extended, looped, or trimmed as needed from scene to scene, with crossfades applied, and 2 frame fades on scene transitions.
1. Build your Locations archive first. Capture your background designs into SceneArkive Locations entries. 2. Set your shortcut. In the SceneArkive Bridge Preferences panel, locate the BG Loader keyboard shortcut. You'll use this shortcut to place Markers in Pro Tools. 3. Place your First Marker. In Pro Tools, place the cursor on the first frame of the first location in your video. Hit the BG Loader keyboard shortcut to open the overlay panel, search for your desired entry, and — since this is the first location — make sure you select "First" before closing the panel. A new Memory Location is created pointing to your chosen entry. 4. Mark every scene cut. Find the next scene cut and place your cursor on its first frame. Hit the BG Loader keyboard shortcut and choose your new location from your list of entries. Unless it's the first or end of your show, choose "Regular" before closing the panel. Repeat for every scene. 5. Place your End Marker. When you reach the end of the act or show, place your cursor on the final frame, hit the BG Loader keyboard shortcut, choose "End," and place your final Marker. 6. Build. Once you're happy with your selections and Marker locations, open the SceneArkive Bridge app and choose the BG Loader panel. Hit "Build" and the Bridge will complete the edit in Pro Tools automatically. Allow the process to complete.
1. Open the Bridge and sign in. Launch the SceneArkive Bridge on your Mac with a Pro Tools session running. The connection chip turns green when the Bridge is connected to Pro Tools. 2. Upload your notes. Go to your account at scenearkive.com, open or create a project, and navigate to the Notes Tracker. Create a Notes Entry, or use an existing one. Upload your notes as a PDF, TXT, or CSV file. 3. Verify that your scenearkive.com account is connected to the open Pro Tools session. If not, hit the refresh button on the top right corner of the web interface. 4. When connected to Pro Tools, you will see a link "Send to Pro Tools Memory Locations" near your attached notes file. Select it, and SceneArkive will transcode the notes in the document. This could take several seconds, depending on how complicated the notes document is. When complete, you will be presented with the extracted notes. 5. Review your notes. Check that the timecodes and text came through correctly. You can edit or remove any note before sending them to Pro Tools. 6. Send Notes to Pro Tools. Hit Send to Pro Tools, confirm the First Frame of Audio in your show, and SceneArkive sends every note to your session as a memory-location marker at its exact timecode.
SceneArkive is fully functional and free for 30 days with full access to the Bridge, Pro Tools Capture, Recall, BG Loader, Notes Extraction, and all 7 Trackers. No Credit Card is needed for Sign Up. Add a Card only if you choose to subscribe after the Free Trial. Cancel anytime.
Capture and recall pause unless you resubscribe, and stored audio is kept for 60 days before it is cleared. If cancelling, we suggest you Recall all your entries or your stored audio will be cleared in 60 days. Or, choose to resubscribe before 60 days to continue using SceneArkive.
Yes. If you're between gigs, pause your subscription and pay only the cloud storage fee $5.99/mo. Pausing deactivates capture, recall, and every tracker, but your entire archive stays intact and safe. When you're back to work, resume anytime to pick up exactly where you left off.
Your archive is private to you by default, stored in access-controlled storage. You control what is shared. You can send individual entries to other SceneArkive users or members of your team.
Your captured audio lives in private, access-controlled cloud storage and is served only through short-lived signed links to you and anyone you explicitly share with. It is never public and never indexed.
The SceneArkive subscription includes 500 GB of lossless and deduplicated storage. Audio is stored as FLAC; lossless, about half the size of the original WAVE, and instead of archiving whole multi-gigabyte source files, SceneArkive captures just the clip you used plus generous handles on each end. On top of that, identical source audio is deduplicated across every entry in your account, so a shared audio file is only ever stored once and referenced across all your entries. The result is full-resolution, sample-accurate audio that takes up a fraction of the space.
Yes. SceneArkive never sees or stores your credit card details. All payments are processed directly by Stripe, the same platform trusted by millions of businesses. On our side we only keep your subscription status to manage your account. Sales tax is calculated automatically by Stripe based on your location.
We collect as little as possible; just an email and password to create your account, handled securely through our authentication provider. Your captured audio is stored privately on access-controlled cloud storage, served only through short-lived signed links available to you and anyone you explicitly share with. We don't use advertising or analytics trackers, and we never sell your data. Two-factor authentication is available on every account.